How to Generate Promo Codes using the File Generation Service
What does it do?
The File Generation Service lets you generate large amounts of true random values to your specification. It is intended to be useful for many different purposes, such as generating promo codes for printers or data sets for scientific simulations.
The service supports four different types of values:
- Alphanumeric Strings
- Integers
- Decimal Fractions
- Gaussians
You can generate up to 20,000,000 values in a single file.
In this guide, we will show how to use the service to generate alphanumerical codes suitable for use as promotional codes. We'll imagine that we're a printing company who has been asked by one of our customers, Gorgeous Flowers LLC, to generate 450,000 promotional codes for use in their December promotion. Gorgeous Flowers LLC want the codes to be unique, such that no two people get the same code. They also want to run a follow-up promotion in February. At that point, they'll want the February codes (which we're not generating today) to be unique with respect to the December codes too.
Before we begin: Your Files
The first page you'll see when you start using the service is the Your Files page. This page gives an overview of all the files you've generated with the service. The files are grouped into ‘File Sets,’ each of which contains a number of related files. In the screenshot below, you'll see our test account already has one file set ‘Test File Set B,’ which contains two files. We won't worry about these files in this guide, though. Instead, we'll kick of the file generation process by clicking on the blue ‘Create a New File Set’ button in the middle of the screen. This will take us to step 1.

Step 1: Initial Details
In this step, we enter the initial file details. This includes whether it will belong to an existing file set or if we will create a new file set for it.

Because we clicked the blue ‘Create a New File Set’ button, the form assumes we don't want to add the file to an existing file set, but instead create a new one. For this reason, it has placed focus on the ‘Filet Set Name’ field. However, we could also choose to add the file to our existing file set, as shown below.

In this guide, we actually do want to create a new file set, so we enter the details. We choose the title for the file set to be ‘Promotional Codes for Gorgeous Flowers LLC,’ such that we can easily identify this collection of files as associated with the promotion later. Because we're just generating the first (December) batch of codes today, we enter ‘Codes for December 2017’ as the file name. When we later want to generate more codes for this promotion, we can add them as a new file to the same file set. Finally, we select our value type to be ’alphanumeric strings.’ In the next step, we'll enter more details about the strings.

Step 2: Details about the Values
In this step, we'll need to enter the details about our alphanumeric strings. (If we'd chosen another value type in step 1, this step would look different.)

In the first field, we need to enter how many values we want the file to contain. Since Gorgeous Flowers LLC is looking for 450,000 codes this time around, that's the number we'll enter in the ‘Amount’ field. They've also told us they want the codes to be eight characters long, so that's the length we enter in the ‘Length’ field.
The ‘Characters’ field contains all the characters that we'll allow to appear in the codes. We can either enter them manually by typing them in one at a time on our keyboard, or we can select one of the handy presets shown in the screenshot below. In this example, we'll use the preset, ‘Alphanumeric Upper,’ which gives us the uppercase characters A-Z and the digits 0-9. We could also have chosen to edit out characters that people tend to confuse for digits and vice versa (e.g., the uppercase letter ‘I’ and the digit ‘1’) but we won't do that in this example.

Note the two checkboxes in the ‘Filters’ section near the bottom of the form. These allow us to eliminate certain strings from the random selection. The first checkbox let us specify that we don't want the file set to contain duplicates, i.e., each random string that appears in our file won't appear again in this or any other file in this file set. (In statistics, this is called selection with replacement.) The last checkbox lets us filter out any strings that contain potentially offensive words in English. We wouldn't want Gorgeous Flowers LLC to send out codes to their customers with profanities randomly appearing as part of the codes.
Step 3: Final Confirmation
In this step, we review the details of our file before we confirm that we want to start generating it. The page displays a summary of the file's name and the file set we're adding it to. If you want to change any of these details, you can click the ‘Back’ button to go back to any of the previous steps.
The page also shows some sample values that illustrate what the values in our file will look like. The ‘Formats’ section summarises the formats the file will be available in. The file will be generated in all formats that have a checkmark next to them, so you don't need to select which formats you want. In our example, all formats except Excel 97 will be generated. The reason that Excel 97 is left out is that it only supports spreadsheets with up to 65,536 rows, and our file will have 450,000.
The final sections of the page shows how long it will likely take to generate the file and what it will cost. Note that the time estimate is advisory and the file may take longer to generate than shown.

If we are happy with the file details as they appear, we click the orange ‘Start the File Generation’ button. This brings us to the final confirmation view shown below.
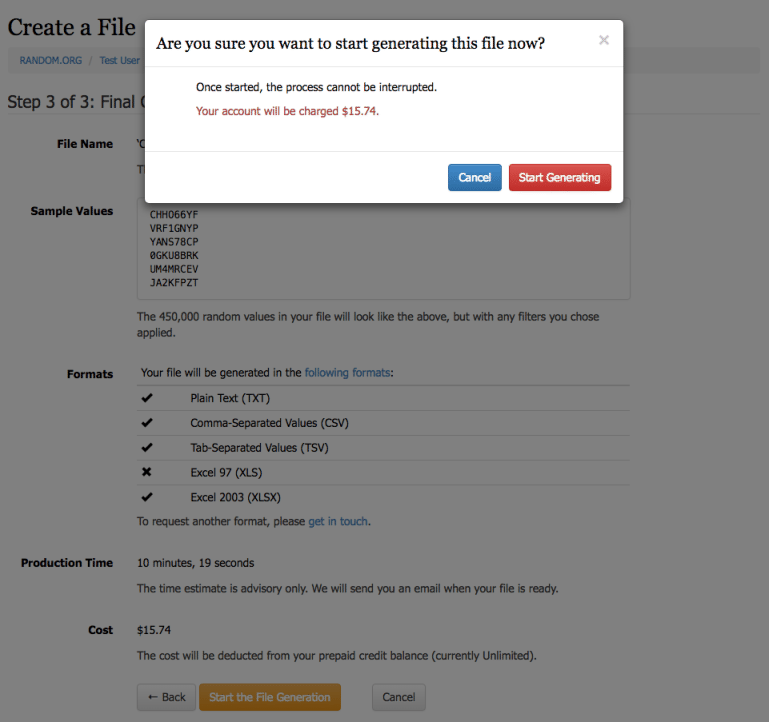
If we are still happy with the file details (and we have enough prepaid credit in our account), then we can click the red ‘Start Generating’ button. After that, there is no way to cancel the file generation.
Step 4: Generation in Progress
After we've started the file generation, the page sends us back to the Your Files overview. We now see a new entry for our new file set, and you'll notice the blue line that shows our file in progress. The percentage counter will update every ten seconds to tell us how much of the file has been completed.

After the file has completed, the blue line changes to green and a download button appears. To download the file, click the download button and select the format you want. You can download the file as many times as you like in the different formats.

Step 5: The Resulting File
Once you've downloaded the file in the different formats, you can open it to see the codes. Below, we've shown what our file looks like in Excel 2003 format.

The screenshot below shows what the file looks like in plain text format.

For more information about the file formats, please see About the Formats.
That's it!
Thank you for reading this intro; we hope it was helpful. If you have questions that weren't answered here, you might want to head over to our FAQ for the File Generation Service. The FAQ also explains how to submit your own questions.